 |
!! Please select country!!
Created: 3 Jul 2009
Last Updated: 22 Sep 2013
|
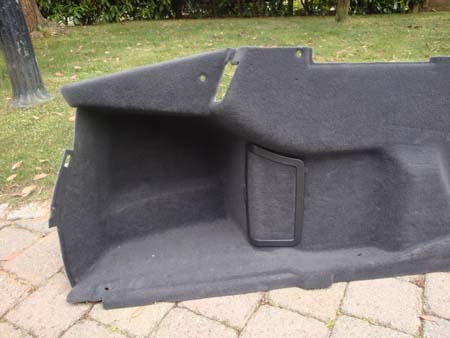
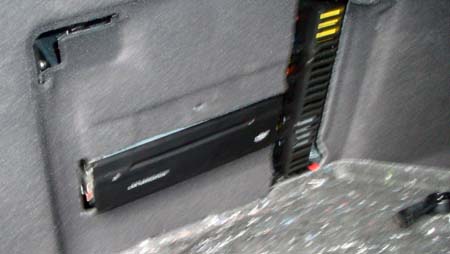
This document describes how to retrofit COMAND APS NTG1 (The DVD based COMAND system) to pre-model year 2009 E class (W211) and CLS class (W219) Mercedes Benz Vehicles. Introduction: The COMAND system consists of 3 parts, the COMAND colour display unit, the Navigation Processor and the Audio Gateway (AGW). The Navigation processor is in the boot (trunk) of the car. The AGW is also in the trunk of the car and contains the radio tuners, the amplifier, the diagnostic gateway, the fibre optic (MOST bus) controler, and the diagnostic gateway. It is located between inner and outer wings on the left hand side. Fitting the AGW is the most time consuming part. Depending on the current spec of your car, depends what you need to fit. If your car has Harmon Karden sound system or the Audio-50-APS black and white navigation system, then it already has the correct Dual Tuner Audio Gateway. If your car has the Audio-20-Casette (the only W211 system with a casette player), then your car already has the Audio Gateway, but you need to replace the AGW with a Dual Tuner AGW, doing just that is relatively simple. If your car has the Audio-20-CD, then you need to install the Dual-Tuner AGW and the AGW wiring loom and associated brackets. If you are installing the AGW wiring loom we recommend you consider installing the iPod kit as exactly the same parts of the car have been dismantled, and in fact, you could consider the iPod kit in anycase. If you have the E class saloon or CLS, if you look at the left and boot trim in your car and it looks like this (in black or grey)
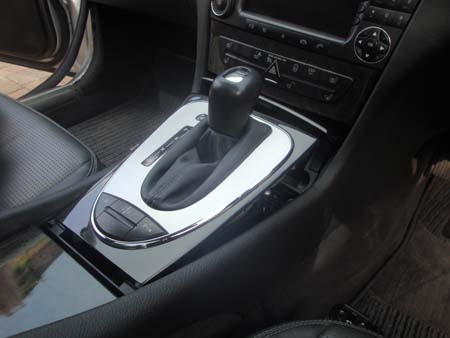
then you also need the navigation processor brackets and a new boot trim. The boot trims are either black or grey, and are different for cars with through loading and without. They are flat (i.e no recess) because the navigation processor is fitted behind them. If your car is the E class estate and it has a similar recess to the picture above then you need a new left trim panel, warning triangle holder and sound deadening. You also need the navigation processor wiring looms & a GPS antenna. Parts Needed: ALL: Cars without Harmon Kardon or without Audio-50-APS Cars with Audio-20-Casette system Cars with Harmon Kardon or Audio-50-APS or Audio-20-Casette - if not installing iPod Cars with Audio-20-CD Cars without existing navigation processor brackets (i.e wrong boot trim) W211 Saloon, W219 CLS with wrong boot trim W211 Estate (T-Model) with wrong boot trim If installing iPod kit. Tools needed: TX25 TORX driver Installation All the photos in this document are from a RIght Hand Drive, W211 E class saloon. The wiring will take the same route (i.e down the left hand side of the car) whether you have Left Hand Drive or Right Hand Drive a) Firstly remove the COMAND unit. Firstly remove the wooden surround panel around the gearstick. On the W211 E class you just pull up the front edge (it is hooked in at the rear edge), and the whole panel comes up.
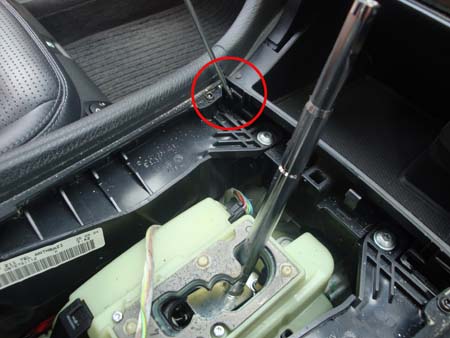
On the W219 CLS it is easier to leave the wood surround in place and pull up the metal surround of the actual gear lever, then you can reach through the hole and push the catches (you can feel one at each end of the front edge of the trim) whilst pulling the wood trim up from the front. Once the panel is pulled up, you can see a knurled plastic nut at the bottom of the gearknob itself, rotate anti-clockwise, unplug all the wires connected to the panel and then pull the gearknob upwards and remove the panel. Now you need to release the catches that hold the ashtray in place, there are two and they clip slightly forward using a screwdriver, whist applying pressure with the screwdriver pull the ashtray upward.
Unplug the blue ashtray light connector and the black cigarette lighter power connector which pulls out at right angles to the body of the cigarette lighter (i.e from the side of the end of the cigarette lighter). The black connector in the picture below is the cigarette lighter power and the blue connector is the ashtray lamp connector. Now remove the 2 screws that hold the lower control panel (the one with the CD changer compartment) in place: -
Unclip the connectors, on cars with no CD changer there is just one connector (the one with lots of wires on the left of the picture below), on cars with CD changer there is also a fibre optic connector (latch on the left of the connector) and the CD power connector (3 wires) to the right of it. Note that if you want to install or remove the CD changer, you should open the CD changer compartment first and then remove the LCP connector (the one on the left) so that it is open for you to work on it.
Now you can remove the whole section, it is easiest to move the gear stick to Drive position when removing it.
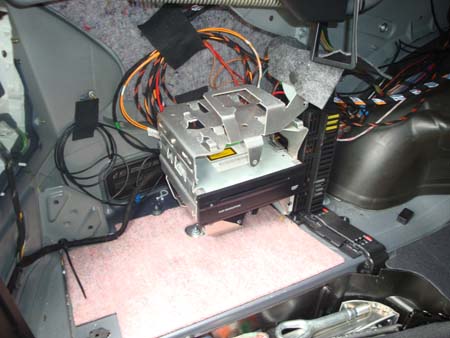
Now undo the two screws that go up into the base of the Audio unit, just turn them until they stop turning.
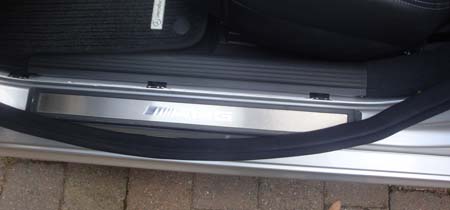
Now you can just slide out the Audio / COMAND unit and disconnect the connections at the rear. Reassembly is just the reverse of removal, remember to test that the CD changer compartment opens and closes before you tighten the screws up - in order for that to work the AGW needs to be connected (which you may have disconnected if you are fitting COMAND) b) If you are installing the AGW wiring loom (i.e your car has the Audio-20-CD in it) then now open the left hand side wiring ducts and the panel above the left hand footwell. Most of the wiring in the W211 E class and W219 CLS class runs down the left hand side of the car. To access the wiring ducts you need to remove the door sills and the left hand rear seat bolster. Remove the inner door (grey plastic) sills from front and rear left hand side doors, this is done by pulling up the rubber trim, and pulling up the plastic sill. They must be pulled up from the rear end as there is a clip at the front end that hooks under the next piece of trim which will break off if you pull it up rather than sliding that end out. The picture below shows the front sill with the rubber removed, the one below that shows the rear with the plastic inner sill removed. Front door sill: -
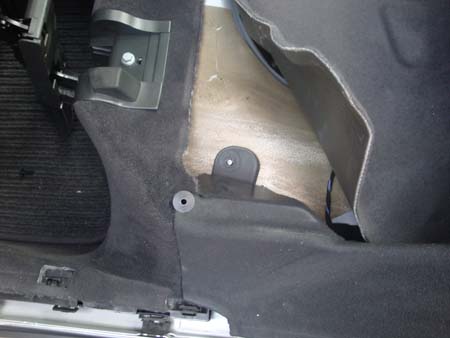
Now remove the rear seat left hand bolster Fold up the rear seat, or in the case of cars without through loading, remove the rear seat base cusion (you can see the clips you need to push in at the front corner of the cushion whilst pulling the front end of the seat up). Once you have removed the seat base or folded it up, you can see a round clip.
Remove the top section of it to allow you to fold up the carpet where you can see a 10mm plastic nut and the rest of the clip, both of which you need to remove.
Once you have removed those you can pull up the side bolster of the seat to reveal the wiring path.
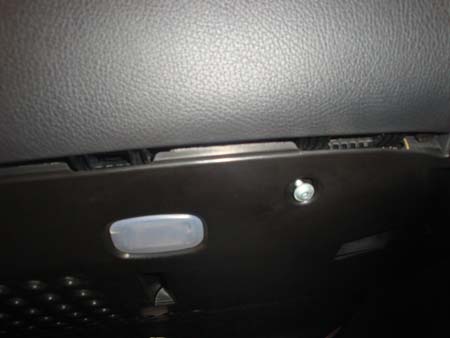
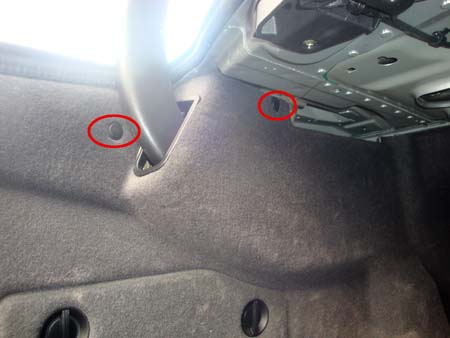
Now remove the panel above the left hand footwell, which is held in by 2 torx screws - dont forget to carefully unclip wiring to the footwell light if present. On Left Hand Drive cars you will have to unscrew the bonnet opening handle and slide the clip at the back of the diagnostic socket to remove that also. If you are installing iPod or AUX on a Left hand drive car you will also have to remove the panel above the right hand footwell.
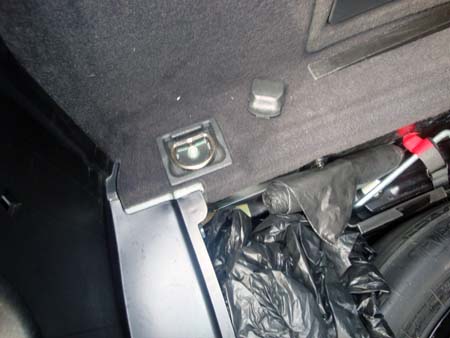
This is done by removing the tie-down hooks (proper hooks on cars with through-loading, small ones on cars without).
Then removing the 2 clips (pull top section out, then the rear section, and the black plastic clip around where the boot hinge comes out.
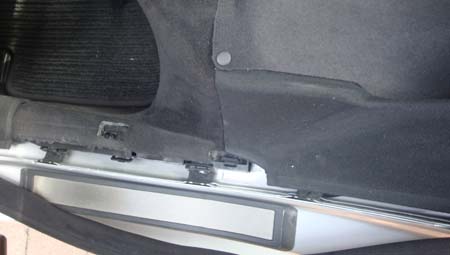
Now pull the rear end of the boot trim out, you can leave the end deep inside the boot in place - be careful not to knock the bulb out of the boot lamp as it is hard to find and will rattle. Re-assembly is just the reverse of removal, again be careful with the boot lamp. If the trim is properly in place putting back the lower tie down screws will be easy.This reveals how the wiring comes from the front of the car to the rear. This picture shows a car with the navigation brackets and processor alredy installed.
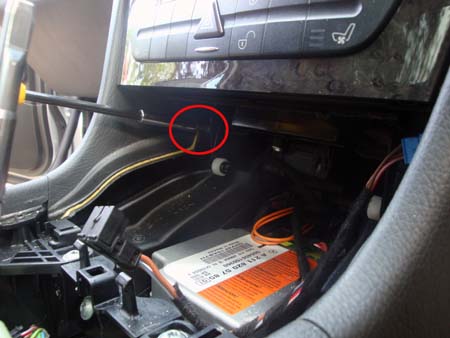
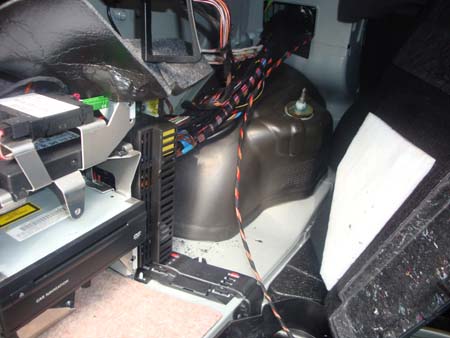
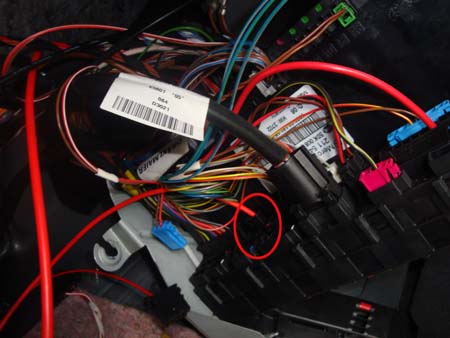
e) Install Nav processor wiring loom. Firstly plug the back connector of the navigation processor into the slot on the back of the fusebox (Rear SAM), The rear SAM has 3 columns of connectors, the correct one (you can not plug properly into the wrong one) is in the middle column aligned with the 3rd row up from the bottom, Note that this picture was taken after the SAM had been tipped forward, which is necessary if you have to install the AGW wiring loom, and should be avoided if you do not. In this picture the AGW wiring loom power has already been installed (thick red wire next to the highlighted connector.
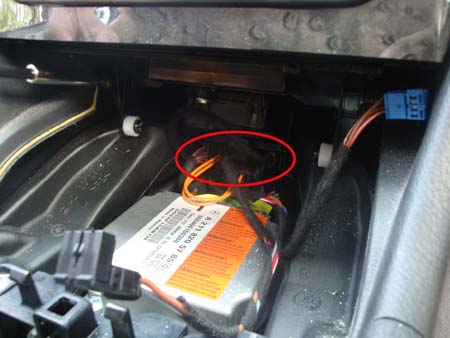
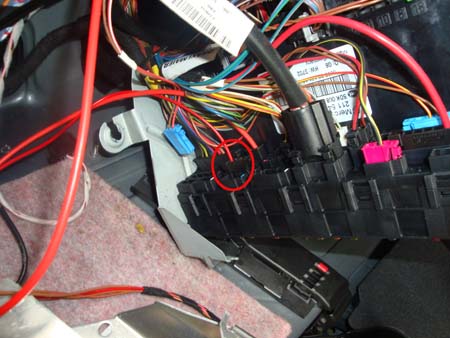
If you are installing iPod or need to install the AGW wiring loom you need to route the pink wire in the cable ducts to the front of the car. In the door sill just forward of the front door is a connector block wth only pink wires in it - the pink wire needs to go in there. If you car has Audio-20-CD and no CD changer or phone system there will only be one wire in it, otherwise there will be more than one pink wire in there. The connector block (called the wakeup distributor) splits in two and then you can install the pink wire and re-assemble. If you are installing on the W211 Estate (T-model), you will need to run the GPS antenna extension cable from the navigation processor to the front of the car so you can put the GPS antenna at the front of the car (above COMAND or glovebox inside the dashboard so it can see through the plastic of the dashboard and the windscreen) as there is no suitable location at the rear of the car for the GPS antenna. Do this at the same time as installing the AGW wiring loom or iPod wiring loom. If you are not installing the AGW loom or the GPS antenna extension cable or iPod kit, then you will splice the pink wire (after cutting it short) ot the pink wire of the existing AGW connector in step (h) below. f) Install AGW wiring loom (cars without existing AGW) The AGW wiring loom must be fed through the centre console (where the head unit is) along the back of the glovebox into the wiring ducts, down the length of the car and into the boot (trunk) where it connects to the AGW and the rear SAM and the earthing point in the boot. Here is a picture showing where the AGW black power connector connects to the rear SAM: -
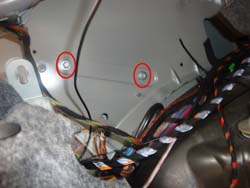
Note that I unplugged the navigation processor power connector to make access easier. The clip in the connector faces towards the rear of the car. The grounding point is on the inner side wall to the right of the fusebox. The wiring comes into the boot along with all the other wiring, behind the rear SAM along the top of the AGW bracket where it plugs into the AGW. At the head unit, look at the existing wiring loom in the car, if your car has phone or CD changer it will have a fibre optic connection, which must be removed from the existing connector. In this case you will have to unwrap enough of the insulation on the new AGW loom to be able to easily remove the fibre connector on the new loom also. On the car's existing fibre loom, remove the blue lock, and remove the fibre from the chamber with the arrow pointing away from the fibre toward end of the connector. Remove the same fibre from the new AGW loom and plug the car's fibre into the open connector on the AGW loom. Now remove the other fibre from the car's loom and join it with the loose fibre from the new AGW loom using the MOST fibre joiner. g) Install the AGW, antenna splitter and its brackets. Bolt the AGW to the AGW bracket, unbolt the fusebox and bend it forward, connect the wiring up to the AGW fixing the wiring that goes to the rear of the AGW to the top of the bracket and slide into place. Connect the black and mustard coax connectors from the antenna splitter loom and route the cable back through to the body of the car. Loosely screw the 2 bolts and washers into place, then the nut that holds the bottom of the bracket to the wheel arch. Tighten the nut up and then the two bolts. Here is a picture of where the bolts fix on the inner wing: -
Where the antenna splitter cable enters the car (on the car side) you will find another black coax connector, which is the wire from the antenna in the rear windscreen to the front of the car, seperate the connector and plug the new antenna splitter cable in instead. If you are just replacing the AGW then all you need to do is to unbolt the fusebox, move it forward and unbolt the AGW bracket and bring it forward and replace the AGW - you will still need to install the antenna splitter as described above. h) Install Navigation Processor Fibre looms Now reach up to the AGW between the inner and outer wings and unclip the fibre/wakeup connector, you need to unwrap some of the tape on the loom so that you can unclip the fibre connector from the loom. Then remove the blue lock on the fibre connector, and unclip/remove the fibre from the connector position with the arrow pointing away from the edge of the connector toward the fibre. Insert the open fibre from the new loom into that vacated position and re-assemble the blue lock and put it back into the cable shell. Connect the fibre you removed into the fibre joiner on the other piece of fibre in the navigation processor fibre loom and squash the joiner together so it locks.
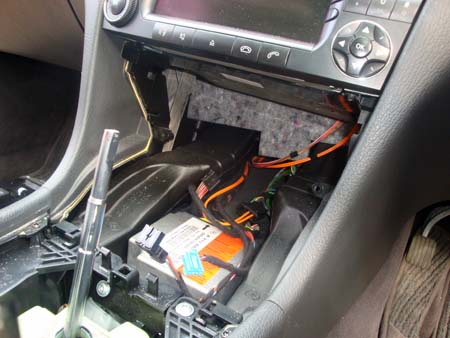
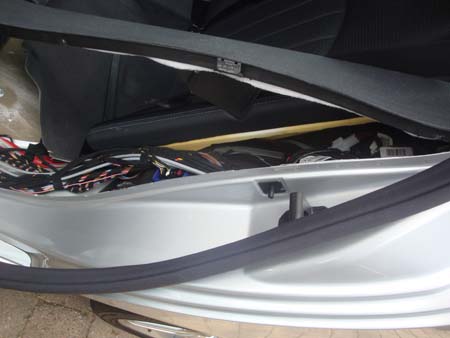
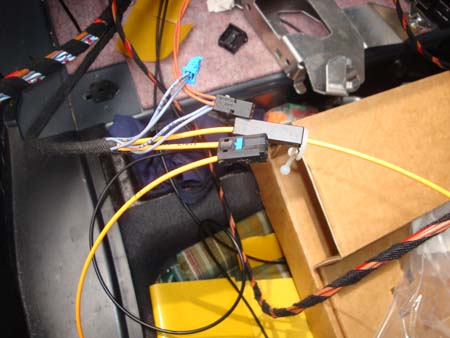
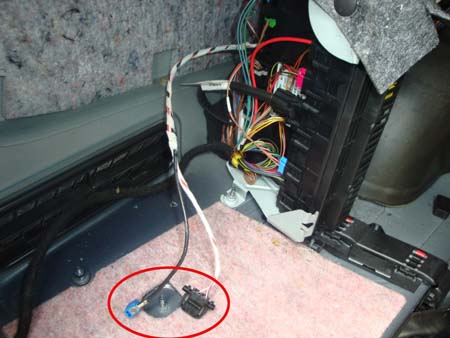
If you are not installing iPod and the car had the AGW wiring loom already, you need to cut the pink wire on the navigation processor loom so its the right length to connect to the pink wire on the fibre connector of the AGW and then use the cable joiner to connect the two pink wires together (the cable joiner must be squashed with a pair of pliers). Now plug the fibre connector back into the AGW. On the Saloon model, Install the GPS antenna under the rear parcel shelf near the entrance to the boot. (just stick it place with some velcro and make sure it is pointing up. It goes on top of the metal part of the shelf but under the material part - the signals pass through plastic/material and glass. Connect the black connector on the GPS antenna to the connector on the navigation processor loom. (or if you are using a non genuine GPS antenna, then it will connect directly to the navigation processor later). On the Estate (T-model) the Here is what it looks like once that loom is in (note this picture doesnt have the AGW loom installed yet, as sometimes I install the navigation power loom, then the AGW loom, then the fibre loom.
i) Install the navigation processor bracket (if needed) Fix the base bracket in (on the W211 estate replace the black warning triangle holder with the new one first) using the 10mm nut (and the nut for the back support of the fusebox), and then install the top section which clips in on the right hand side on the fusebox mountings and then folds into place & the bolt added to hold the 2 sections together. j) Install the navigation processor Connect the fibre optic connector, the GPS antenna and then the power connection (having passed the wiring through the bracket) and slide the navigation processor into the lower slot on the bracket.
If you have a W211 saloon or W219 CLS with the correct boot trim already, then you will have to cut a section the size of the navigation processor out of it so it looks like this when re-assembled.
k) Re-assemble & Test, Re-install the COMAND unit. and the lower control panel with it's wiring - don't screw it in yet. If your car has CD changer you'll have to connect that back up (both fibre and power connectors) also. Power it up - if you have everything correct the system will come on. If it comes on and turns off again after displaying the Star logo then you have messed up connecting the fibre optics properly. Now that you know it works, re-assemble everything else. Do not forget the footwell lighting, or the cigarette lighter power/lighting or connections to the panel with the gear knob. Remember to be careful installing the boot trim so as not to dislodge the boot light. You will have to drive the car to get the map position on the satnav to update to your current location. l) Code with Star Diagnosis Your mercedes dealer, or specialist independant will have to do the following coding: i) Instrument cluster - enable navigation ii) AGW - If you have installed a new AGW then do the 'initial coding' sequence which will set the MOST ring order, the tuner frequency range etc and check the software is up to date. Othewise, just run the processes to see if the AGW needs it's software upgraded and to set the MOST ring order to match the current MOST ring order. iii) COMAND - set the region code correctly iv) COMAND - upgrade the software on the COMAND to the Model Year 2007 version (which has the ability to display ETA on the map screen during navigation) - the dealer must use update disk part number W211 589 13 22 00
V1.0 3rd July 2009. |

If you found this information useful, please support the site by making a donation via Paypal. Any amount at all helps me improve the information on the site. |
Comand Online Ltd - the place to buy Mercedes iPod kits, phone kits, retrofit parts & map disks MY AUTOCAR - THE BEST PLACE TO TALK CARS |